Bedroom Furniture Fitted wardrobes
 Our bedroom project had been on hold for months due to job commitments, and the looks coming from Mrs W were getting worse, so when work finally calmed down I figured I needed to win back some brownie points. This led to ‘the wardrobe project’.
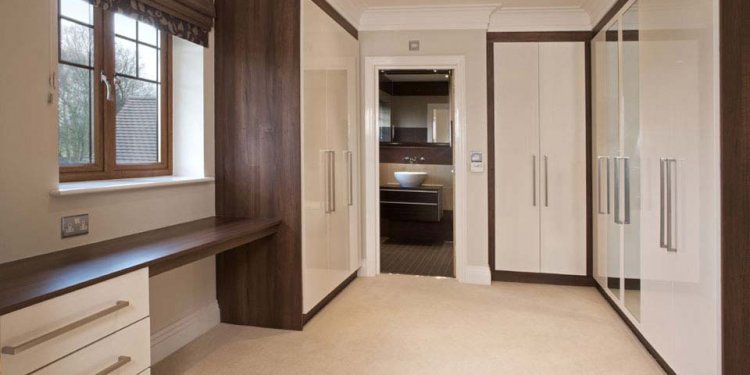
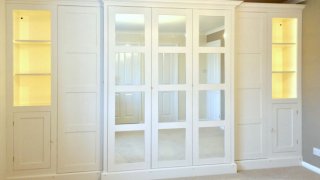
The freestanding full depth wardrobe we had before made the room feel small, so in order to maximise floor space and storage space at the same time, I convinced Mrs W that a shallow fitted wardrobe would best meet our needs. We both like the traditional bespoke hand painted look but to commission a 3.6meter stretch of handmade wardrobes would have cost a fortune so I decided to tackle this project myself, with the help of Ikea and PAX.
I spent some time researching what it was about the expensive wardrobes that made us like them, and realised that they had some key features:
- Raised base with a moulded skirting.
- Wardrobe sections ‘framed’ by solid wood borders.
- A solid looking cornice or top moulding.
- Sections with different depths rather than a completely straight run.
- Combination of shelving and cupboards.
- Panelled doors, some with mirrors.
- Good use of LED lighting.
- Hand painted eggshell/satin finish.
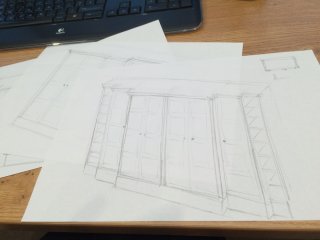
 I used this list to work out how I could build custom parts around PAX frames to achieve the look we desired. After a lot of sketches I began to figure out what might work.
The first step was to build a platform to lift the wardrobe further off the floor and achieve that traditional quality look. I used CLS timber for this purpose, laid flat, cut using a mitre saw and simply screwed together. It was important the platform was perfect since all the other pieces would be referenced to it. I spent a lot of time ensuring the sections were the right distance from the rear wall and making sure all the angles were perfectly square:
Small squares of 3mm plywood came in handy to level it, and quite a few were needed because the gripper rods under the carpet at the back made that part higher. I used metal brackets to screw the platform to the chipboard floor, through the carpet. The whole idea was that if we decided we didn’t like it in five years’ time, the whole thing could be removed without much impact on the room. Cutting chipboard to size to cover the top was trickier than I thought due to the different depths of the sections, but once that was done it was screwed over the top. It’s important during this step to ensure that the edges of the chipboard are perfectly in-line with the edges of the CLS, or the skirting board later would not be square:
Now the platform was perfectly level and perfectly sized it was time for the next stage of the project: the PAX frames. The carcass is formed by one 210 x 100 x 35 and five 210 x 50 x 35 white stained oak frames. With hindsight, two of the narrow frames should have been the plain white finish as they were to be painted white later, and Zinsser primer sticks better to flat than the grained effect melamine. I purchased all the internal fittings at the same time.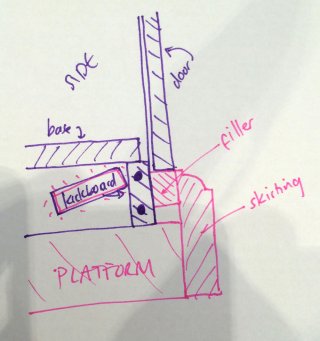 Again, with hindsight I would have chosen plain white shelves for the far right and far left frames to make them easier to paint later.
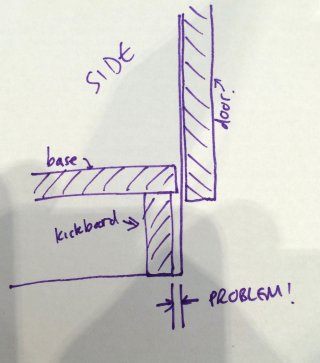
When building the standard PAX frames I needed to make two modifications. The first is quite subtle and took me a while to figure out when I was designing the whole thing initially. But if this is done correctly it will avoid a long narrow gap existing at the bottom of all the wardrobes when it’s finished. The sketch below shows a side view of the normal PAX wardrobe construction:
As you can see, the kickboard is set back from the sides of the frame, which makes sense normally, but for this hack we need it to lie flush with the edges of the sides. If it is not flush then the gap marked ‘PROBLEM’ will result in a gap behind the filler pieces we will add later. This wouldn’t look great. The sketch below shows how the kickboard position is moved such that it is flush with the edge of the sides:
The parts drawn in pink are the extra pieces to be added later – the CLS platform, a skirting board and a filler piece. You can see that by moving the kickboard flush, the filler can run across the fonts of the wardrobe frames, with no gap to the kickboard, and, if positioned correctly, the skirting board will bridge the platform edge and filler perfectly. This means no gaps, and no fiddling around with different thickness filler pieces, which would have driven me mad.
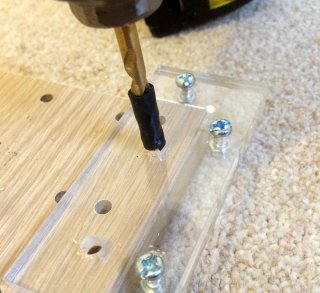
The first modification to the PAX frames was therefore to re-drill the holes for the bottom kickboard dowels to make them flush with the edges of the PAX sides as just discussed. Just making an offset (in one axis) on the existing holes wouldn’t work as the offset was small and the holes would join up. Luckily by flipping the kickboards the dowels end up sufficiently far from their old positions, thus avoiding this problem. I made an acrylic template consisting of a rectangular and an L-shaped piece screwed together in order to get the holes perfect every time.
This procedure was repeated on all the PAX frames. With hindsight, I would have made the template double sided so that it could work for both sides of each PAX frame without having to unscrew and flip over the L-shaped piece.
With the PAX frames constructed the assembly now looked like this:
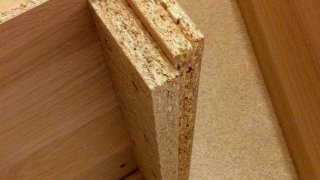
Luckily the width of the room perfectly fit the correct number of PAX frames and required gaps. However, this did mean that the far right and left frames were tight to the wall and as a result were sitting slightly on the existing skirting boards. This led to the second customisation, just for the far right and left frames, which was to plane 5-10mm from the bottom of the offending sides and add an offset piece of chipboard, screwed to the side. This extra piece sits away from the skirting board and firmly on the platform:
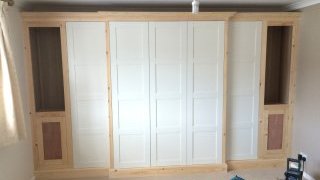
I joined the pairs of adjacent PAX frames with the usual supplied joining screws and stepped back to consider all the woodwork which was about to follow.
Two lengths of 8 x 2 inch planed timber were created by screwing and gluing 6 x 2 inch to 2 x 2 inch lengths. These are crucial parts of the overall structure, and are screwed through the sides of the middle wardrobe pair and also the outer wardrobe pairs. The front face of this piece must be flush with the doors of the PAX unit when they are closed. I used a piece of wood as a spacer to make sure this offset was correct. You’ll see later how these pieces achieve the look of a solid wardrobe carcass rather than a modern door to door look.

Share this article
Related Posts
Latest Posts


