Legs for Dining room Table

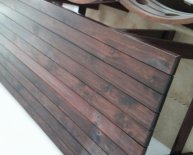
 Never in my wildest DIY-dreams did I think we would build a gigantic kitchen table! After searching (a LOT) and not finding the perfect table, we started to consider making our own. We talked about DIYing a table, but didn't have the courage until we saw Rachel's and Emma's beautiful DIY tables. They gave us the confidence to know it could be done! We spent some time choosing how we wanted the table top to look, including the width of the boards and the color of the finish. Then we jumped in with both feet... why not? Here's what happened:First we planned out how large we wanted the table to be. Our new house is an older house, so many of the rooms are regular sizes (compared to more standardized, modern homes). With these measurements, we then went to a local hardware store and bought our lumber: 4 long planks for the top, 9 smaller planks for bracing and framing the bottom, and 2 longer small planks to frame the outer edges. We used mostly pine (because it is pretty and affordable) with a few oak pieces among the 9 small planks to go on the bottom. Oak is a harder wood, so our goal was to add stability. If you plan to replicate this project, feel free to adjust what lumber you buy based on your dining room size. The important thing to note is how the bottom of the table is assembled (see photo above).
I think we used right around 90 screws, most of a 100 piece box. :)
And we used four 3-prong hairpin legs, each is 28" tall.
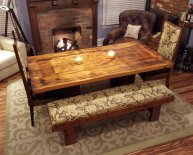
Note: We spent about $350 on the supplies for this table that seats 8. :)Once we had all our supplies, we spent a couple days (with a lot of help from Emma and Dad—thanks, guys!) putting the table together. The goal was to create a stable surface with framing wood around all the edges so it would look more finished. We assembled the table upside down, then flipped it over, sanded, and prepped it for staining.Tips for staining and sealing: Consider other woods or colored surfaces in your dining room before choosing a stain. The floors in our home are sort of a honey color, so we tried to choose a stain that mimicked (but not matched) this tone. Be sure to wipe down and allow your table to dry before applying stain. Use a brush to lightly coat a small area and then use an old towel or cloth to wipe up any excess stain. You can always add more if needed, so go light for your first coat. Consult the product label for dry time recommendations.
After staining, we sealed our table with a polyurethane (pictured above). This gives the finish an extra coat of protection and makes it a little easier to clean/wipe down after meal times. I still recommend using coasters on a table like this with cold drinks though.I am completely happy with our finished table. I love the woodgrain, the honey-colored finish and the simple hairpin legs. As a bonus, I'm so happy we were able to create a table that our family can grow into for such a reasonable price!
I know that a DIY on this level isn't for everyone. Our dad helped us (a LOT... thanks again, Dad!), and it only took a few days to complete (including the building, staining and sealing) once we had all the supplies figured out.I hope that this post encourages some of you that you really can build your own dining room table! We've done a lot of DIY projects in our new home, and I am most proud of this one. We saved thousands of dollars and ended up with our dream table! Thanks for reading. xoxo. Elsie
 Never in my wildest DIY-dreams did I think we would build a gigantic kitchen table! After searching (a LOT) and not finding the perfect table, we started to consider making our own. We talked about DIYing a table, but didn't have the courage until we saw Rachel's and Emma's beautiful DIY tables. They gave us the confidence to know it could be done! We spent some time choosing how we wanted the table top to look, including the width of the boards and the color of the finish. Then we jumped in with both feet... why not? Here's what happened:First we planned out how large we wanted the table to be. Our new house is an older house, so many of the rooms are regular sizes (compared to more standardized, modern homes). With these measurements, we then went to a local hardware store and bought our lumber: 4 long planks for the top, 9 smaller planks for bracing and framing the bottom, and 2 longer small planks to frame the outer edges. We used mostly pine (because it is pretty and affordable) with a few oak pieces among the 9 small planks to go on the bottom. Oak is a harder wood, so our goal was to add stability. If you plan to replicate this project, feel free to adjust what lumber you buy based on your dining room size. The important thing to note is how the bottom of the table is assembled (see photo above).


")
")
Share this article
Related Posts

Latest Posts


